A few years ago, Laura got hooked on braiding friendship bracelets. She quickly learned to follow intricate patterns that left me completely lost. One day as I searched for new patterns online, I came across an interesting variation called kumihimo.
Originating in Japan during the eighth century, kumihimo (“gathering of threads”) developed into an extremely beautiful and useful art form. Its original purpose was to lace together plates of samurai armor and embellish swords. Some warriors could be identified by the unique intricate patterns of their kumihimo cords. Kumihimo braids were later used to fasten the obi (wide sash) around a kimono (traditional formal Japanese dress). Today kumihimo is used for many purposes, including beautiful jewelry.
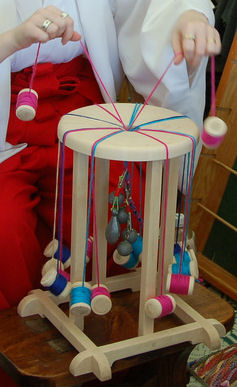
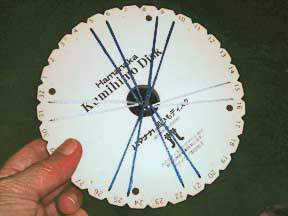
Historically braided from pairs of silk threads on wooden looms known as marudai, some patterns have been adapted for braiding on foam disks with slits to hold the threads.
I found the repetition of the kumihimo patterns to be very calming. I especially liked a pattern known as ridged spiral, and decided to utilize it in gifts for Laura’s basketball team a couple of years ago.

My pattern was featured in the What a Knit May 2012 newsletter. Space constraints caused the pattern to be significantly condensed, so I am publishing the full version here for those interested.
KUMIHIMO TEAM BRACELETS
Designed by Sara Hartman
Materials for approximately ten bracelets and one key fob:
- two skeins of embroidery floss or craft thread in main (ridge) color
- four skeins of embroidery floss or craft thread in background color
- lanyard end or key ring
- 4mm end caps, two per bracelet
- split rings or jump rings, two per bracelet
- lobster claw clasps, one per bracelet
- beads or charms, one per bracelet (I used Bead Magic basketball beads)
- kumihimo disk (my favorite is the Bead Smith mini kumihimo disk)
- 12 bobbins (I used small EZ Bobs)
- glue (I used E-6000)
- floss threader (I used the kind the orthodontist gave to my kids)
- weight (I used a 1-ounce fishing weight)
Unwind and find the midpoint of each skein of embroidery floss. The main color will start in slots 32 & 16 and 1 & 17. The background color will start in slots 6 and 22, 7 and 23, 10 and 26, 11 and 27. Center the floss on a foam kumihimo disk and wind the ends onto fold-over bobbins. Once all six skeins of floss are prepared, put a lanyard end around the intersected strands of floss, and hang a weight on it.
Braid in the ridged spiral pattern until the main color runs out. (Note: This pattern may be found on page 21 of Makiko Tada’s Comprehensive Treatise of Braids VI: Kumihimo Disk and Plate. There are online instructions at http://www.weirdollsandcrafts.com/none/round3.html. If you prefer a visual tutorial, see http://www.youtube.com/watch?v=zGZL7qpkdNI (it’s in Spanish but has English subtitles and is easy to follow). Remove the braid from the disk and gently stretch it. I found that each complete rotation around the disk makes 1” of braid, and six skeins of standard embroidery floss yields 60 – 66” of braid.
Use a floss threader to string about 12 beads onto the braid. (I usually pull 2-4 strands of floss through the beads at a time.) Extra beads are easily removed at the end of the process, but near impossible to add after the first bracelet is cut.
Cut segments to 6.25” (for a 7” bracelet) making sure there is a bead on each segment before you cut it. (Adjust the segment length for longer or shorter bracelets.) Glue on the end caps. When the glue has dried, add split rings and lobster claw clasps to attach them.
Leave a bead on the leftover braid with the lanyard end to make a key fob for the coach. Tie an overhand knot at the desired length and unravel a bit of braid for a short tassel.
Repeat as necessary for the number of bracelets and key fobs needed for your team. My daughter gave these to her teammates and coaches at Christmas and they loved them!
